Leaf Discs
_____________________________________________________________________________________________________________________________________
Standard II (Life Science): Understand the properties, structures, and processes of living things and the interdependence of living things and their environments.
Performance Objectives: Students will be able to explain the diverse structures and functions of living things and the complex relationships between living things and their environments.
_____________________________________________________________________________________________________________________________________
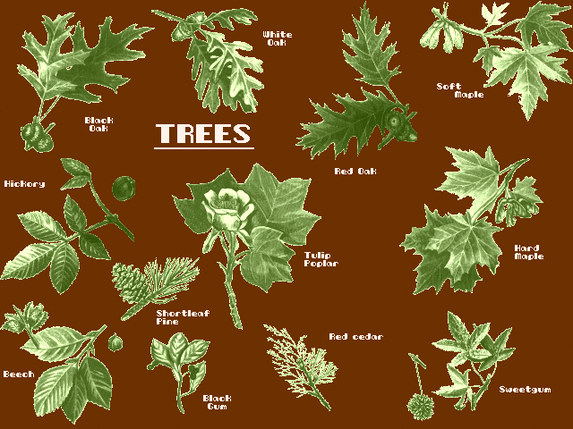
Demonstration/Background Information: Learning to identify trees from their leaves is easier when you have a reminder of what they look like. Each student-pair will be given a “Know Your Trees by their Leaves” handout like the one that follows and they will use the Leaf Identification Guide to determine which leaf belongs to which tree.
Standard II (Life Science): Understand the properties, structures, and processes of living things and the interdependence of living things and their environments.
Performance Objectives: Students will be able to explain the diverse structures and functions of living things and the complex relationships between living things and their environments.
_____________________________________________________________________________________________________________________________________
Demonstration/Background Information: Learning to identify trees from their leaves is easier when you have a reminder of what they look like. Each student-pair will be given a “Know Your Trees by their Leaves” handout like the one that follows and they will use the Leaf Identification Guide to determine which leaf belongs to which tree.
Activity: This is a class activity where students will work in pairs to identify trees and their leaves.
Materials: Samples of leaves, leaf handout, several leaf identification books, polymer clay (such as Sculpey), waxed paper, bowls with a large base, paper, pencil, toothpicks and tweezers, and an oven.
Safety Considerations: The teacher must be aware of any health issues related to plants or allergies to certain trees. These students may require an alternative assignment. The teacher will use the oven, but students are cautioned about burn prevention. There will be no horseplay to prevent damage to the leaves and potential accidents.
Procedure/Steps to follow:
1. Each student will be required to collect leaves from their yard or a nearby park and bring them to school.
2. Student-pairs will work together to identify each leaf using the handout and the leaf identification book.
3. They will record the names on the student handout so as to remember which name goes with each leaf.
4. Roll some of the polymer clay into a ball and place it between two sheets of waxed paper.
5. Flatten the clay ball using the base of the bowl.
6. Lift the top sheet of waxed paper and place a leaf on the clay disc.
7. Replace the waxed paper. Flatten the disc with the base of the bowl until it is about one quarter-inch thick.
8. Lift the waxed paper from the back of the disc.
9. Label the back side of the disc with the tree name using a toothpick. Carefully remove the leaf from the disc using the tweezers.
10.Follow the polymer clay directions and bake the discs in the oven. (Students will need teacher assistance.)
11.These leaves will be displayed as a visual representation of this activity.
|
Leaf Identification |
||
|
Leaf
Name |
Identifiable
characteristics |
Name
of Tree |
|
|
|
|
|
|
|
|
|
|
|
|
|
|
|
|
|
|
|
|
Effective Question: Choose two leaves to compare, what are their differences and/or similarities? ______________________________________________________________________________________________________________________________________.
Analyze and Conclude: You have now learned more about trees and their leaves. Name some ways you will continue to increase this knowledge? ______________________________________________________________________________________________________________________________________.
Analyze and Conclude: You have now learned more about trees and their leaves. Name some ways you will continue to increase this knowledge? ______________________________________________________________________________________________________________________________________.
(Staunch, 2013)
