Predicting the Weather: Making an Anemometer
___________________________________________________________________________________________________________________________________
Earth Science Benchmark II: Describe the structure of Earth and its atmosphere and explain how energy, matter, and forces shape Earth’s systems.
Performance Objective: Students will learn that air is a substance that surrounds Earth (atmosphere), takes up space, and moves, and that temperature fluctuation and other factors produce wind currents.
___________________________________________________________________________________________________________________________________
Demonstration/Background Information: The teacher will show a short video, Anemometers and Wind Vanes: Measuring Wind (www.cosmeo.com, 2013). This video shows pictures of actual anemometers, how to create your own and explanations about what they’re used for. The teacher further elucidates: An anemometer is a device that tells you how fast the wind is blowing. The energy in the moving wind can be used to generate electricity. But you have to know how fast the wind
is blowing before you can harness wind power. Wind speed is important for wind energy. Wind turbines, which are the machines that change the movement of the wind into electricity, need a constant, average wind speed of about 14 miles per hour before the wind turbines can generate electricity. That's why wind farms, where there is a lot of wind turbines grouped together, are located in windy spots.
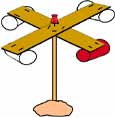
Activity: Students will build a device that is a model of a wind speed indicator.
Hypothesis: Our anemometer will show __________________________________________________________________________________________________.
Materials: Scissors, 4 small paper cups (like drinking cups), a marker pen (any color), 2 strips of stiff, corrugated cardboard - the same length, ruler, stapler, push pin, sharpened pencil with rubber on the end, modeling clay, and a watch that shows seconds
Safety Precautions: No horseplay when using materials; read all directions carefully and ask teacher for clarification, if needed.
Procedure/Steps: Students will work in pairs; gather materials, read all directions, and follow steps to construct an anemometer. Students will present their creation to the class.
1. Cut off the rolled edges of the paper cups to make them lighter.
2. Color the outside of one cup with the marking pen.
3. Cross the cardboard strips so they make a plus (+) sign. Staple them together.
4. Take the ruler and pencil and draw lines from the outside corners of where the cardboard strips come together to the opposite corners. Where the pencil
lines cross will be the exact middle of the cross.
5. Staple the cups to the ends of the cardboard strips; make sure the cups all face the same direction.
6. Push the pin through the center of the cardboard (where the pencil lines cross) and attach the cardboard cross with the cups on it to the eraser point of the
pencil. Blow on the cups to make sure the cardboard spins around freely on the pin.
7. Place the modeling clay on a surface outside, such as a porch railing, wooden fence rail, a wall or a rock. Stick the sharpened end of the pencil into the clay
so it stands up straight. Your anemometer is now ready for use!
Investigation: To measure wind speed using the anemometer, the student pairs will use a clock or a watch to count the number of times the colored cups spins around in one minute. They will keep a three day record of the wind speeds they’re measuring.
Earth Science Benchmark II: Describe the structure of Earth and its atmosphere and explain how energy, matter, and forces shape Earth’s systems.
Performance Objective: Students will learn that air is a substance that surrounds Earth (atmosphere), takes up space, and moves, and that temperature fluctuation and other factors produce wind currents.
___________________________________________________________________________________________________________________________________
Demonstration/Background Information: The teacher will show a short video, Anemometers and Wind Vanes: Measuring Wind (www.cosmeo.com, 2013). This video shows pictures of actual anemometers, how to create your own and explanations about what they’re used for. The teacher further elucidates: An anemometer is a device that tells you how fast the wind is blowing. The energy in the moving wind can be used to generate electricity. But you have to know how fast the wind
is blowing before you can harness wind power. Wind speed is important for wind energy. Wind turbines, which are the machines that change the movement of the wind into electricity, need a constant, average wind speed of about 14 miles per hour before the wind turbines can generate electricity. That's why wind farms, where there is a lot of wind turbines grouped together, are located in windy spots.
Activity: Students will build a device that is a model of a wind speed indicator.
Hypothesis: Our anemometer will show __________________________________________________________________________________________________.
Materials: Scissors, 4 small paper cups (like drinking cups), a marker pen (any color), 2 strips of stiff, corrugated cardboard - the same length, ruler, stapler, push pin, sharpened pencil with rubber on the end, modeling clay, and a watch that shows seconds
Safety Precautions: No horseplay when using materials; read all directions carefully and ask teacher for clarification, if needed.
Procedure/Steps: Students will work in pairs; gather materials, read all directions, and follow steps to construct an anemometer. Students will present their creation to the class.
1. Cut off the rolled edges of the paper cups to make them lighter.
2. Color the outside of one cup with the marking pen.
3. Cross the cardboard strips so they make a plus (+) sign. Staple them together.
4. Take the ruler and pencil and draw lines from the outside corners of where the cardboard strips come together to the opposite corners. Where the pencil
lines cross will be the exact middle of the cross.
5. Staple the cups to the ends of the cardboard strips; make sure the cups all face the same direction.
6. Push the pin through the center of the cardboard (where the pencil lines cross) and attach the cardboard cross with the cups on it to the eraser point of the
pencil. Blow on the cups to make sure the cardboard spins around freely on the pin.
7. Place the modeling clay on a surface outside, such as a porch railing, wooden fence rail, a wall or a rock. Stick the sharpened end of the pencil into the clay
so it stands up straight. Your anemometer is now ready for use!
Investigation: To measure wind speed using the anemometer, the student pairs will use a clock or a watch to count the number of times the colored cups spins around in one minute. They will keep a three day record of the wind speeds they’re measuring.
|
Record of Wind Speeds |
|||
|
Day |
Time of Day |
Location |
Speed (# of spins/minute) |
|
|
|
|
|
|
|
|
|
|
|
|
|
|
|
Effective Questions:
Measure the wind speed at different times of the day. Is it the same in the morning; the afternoon; the evening? Move your anemometer to another location. Is it windier in other places? Do trees or buildings block the wind?
___________________________________________________________________________________________________________________________________.
Analyze and Conclude: On the lines below, write what was learned from this experiment? Was your hypothesis correct? Why or why not?
___________________________________________________________________________________________________________________________________.
(Fabian, 2013)
